

Our Time Machine
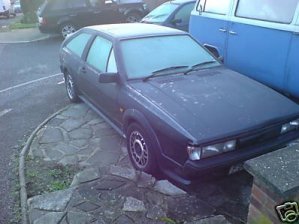
The car we decided upon for our Time Machine was the VW (Volkswagon) Scirocco. It was the closest looking car to a Delorean and would be the next best thing for the budget we had. We looked in lots of papers and on ebay and this is the final car we ended up with. Ours is a 1988 Scala Model in grey / blue. It looks black here in the photo but its due to the frosty morning the photo was taken by the seller.
 |
![[Click To Enlarge]](images/auction.jpg) |
1988 VW Scirocco Scala |
The Actual Auction |
We didnt actually win the auction, Team member Lee forgot to bid on the auction one evening and we thought all was lost. I emailed the seller the following day and said if the auction fell through to give me a call. One week later they did, the original winner never contacted them and we arrange to go and view the car the following Sunday. We arrived, checked the car out and decided to make the guy an offer, after a few minutes of bartering we managed to seal a deal on it. The car although a runner had a few problems ie the large water leak so the first stop was to get it to the local services so we could make a temporary fix to the leak and top up on all fluids (fuel, water & oil) before the journey home.
 |
 |
At the services by the M25 |
Home.. So first things first. Clean it! |
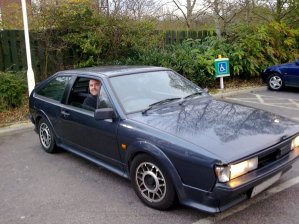
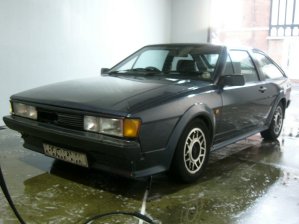
With the car now on home soil, I set about giving it a good clean to see what state it really was in. The inside had been dismantled a bit and the front of the car had seen some wars and the various parts were damaged. Its amazing the colour of the car really shows in these two pictures depending on the light it either looks blue or grey.
 |
 |
 |
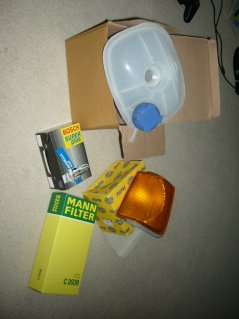
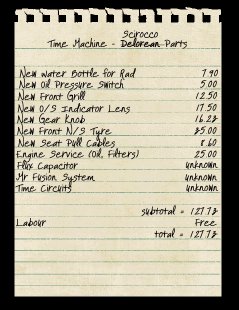
New Water Tank, Indicator, Plugs and Air Filter |
The first list of parts required. |
Making our Mr Fusion! |
With an initial parts list made up we popped down our local German & Swedish Motor Factors and got the parts on order, its was Xmas eve and they werent due in until the new year. This wasnt much of a problem as we have plenty of time to get the car ready. Most of the parts were easy to get hold of except for the grill. The staff recommended we go back to ebay for one.
Old grill removed, replacement fitted, then some DMC treatment. |
Making Mr Fusion
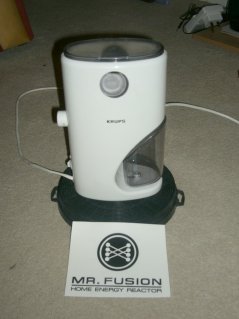
You can see the car is taking shape, in the meantime I decided I would start work on some of the gadjets(Gimics) we aim to have in the car. By pure luck I managed to find a seller in Ebay Germany who was selling the exact model of Coffee maker used on the Original Deloreans in the Back to the Future movies. Apparently they are 1970's Krupps Coffee Makers, well I couldnt resist and sent the guy an offer, he accepted and very soon we had the first part to our Mr Fusion. Obviously I could spend hours trying to make it look exactly like the film, so instead to reduce time and costs I set about looking for the ideal platform to mount the Mr Fusion to. To make my Mr Fusion its made of three main parts.
- The Coffee Maker,
- An Oven Carbon Filter
- A Circular Toolbox.
The toolbox is the bottom base and attached to that is the Oven Carbon Filter and then finally the Coffee Maker.
Result = Our Very Own Mr Fusion. I am looking forward to mounting this to the rear of the car pics will follow then.
 |
 |
 |
 |
The Coffee Maker |
The Artwork |
Creating Mr Fusion |
Applying the Artwork |
 |
 |
 |
 |
Fused :) |
Mounting Plate |
Mounting to Car |
Mounting to Car |
Making The Time Circuits
Next project... Time Circuits!
The only place I felt the time circuits would fit was the glove box area. So by dismantling the glove box and removing the insert I found there was enough space. The next stage was to mock up a cardboard version to get the dimensions correct before the sheet of alloy was ordered and cut to shape. On a piece of paper I did a mock layout of how the display should look, I have concerns that the LED's chosen are just a bit to big and make a tight fit.
 |
 |
 |
 |
Inside the car |
The Glovebox |
Removing the lid |
Removing innner fixings |
 |
 |
 |
 |
Removing Inner Section |
All ready for template |
LED Layout on paper |
Cardboard Template |
 |
 |
 |
 |
Making the LED Circuits |
Testing circuits in template |
Panel is cut out |
Panel is coated in chrome |
 |
 |
 |
 |
LED Circuits are mounted |
A full test of time circuits |
Fitting into Car |
Testing in car |
Progress with our time circuits |
Making The 88 Mph Speedo

Everyone knows the Time Machine only travels thru time when it gets to 88 Miles per hour. The next plan was to create the digital display to mount on the top of our dash. For this thou I decided I would hack a digital tachometer and fit a new display to it into a small grey ABS box just like in the film. This means that the display will actually change depending on the speed of the vehicle.
 |
 |
 |
 |
 |
Dismantling old tacho |
New LED mounts |
Wiring up LED Segments |
Test placement on box |
Hole cut and test mounting |
 |
 |
 |
 |
 |
88 Mph Test |
88 Mph Test closeup |
With switch fitted. |
Fitted on dash. |
In Car Test |
Making The Flux Bands
Next step, was to alter the bumpers so that they glow when the car hits 88mph...research shows they are called "Flux Bands" So a trip to my local gardening centre provided me with some light alloy piping.. I somehow need to fit this to the existing front bumper and make it fit. For this i went to my local plumbing shop and bought some plastic pipe clips. Next I needed to find some mesh that would join the two pipes together. I now needed so somehow light these tubes so scanning ebay I came up with some special wire that I ordered from China.. the wire is called EL Wire or "luminescent wire" you can get it in a variety of colours and it has an amzing glow to it. This would be fitted between the alloy tubing and would provide the ideal glow!
 |
 |
 |
 |
Alloy piping |
Clipped to bumper |
Cutting to length |
Bending to bumper shape |
 |
 |
 |
 |
Fitting corner clips |
Easy Screw fit |
..to both ends. |
Corner Pipes Fitted |
 |
 |
 |
 |
Upper Rail Completed |
Lower Rail Completed |
Joining Mesh |
All Mesh done |
 |
 |
 |
 |
Flux Bands Pre Spraying |
Being Sprayed |
Adding EL Wire |
EL Wire Test |
Making The Flux Exhausts
Next step, was to make the flux exhausts, these are the outlets attached to the rear of the car that really make the look of the time machine. With my hand in plaster I called in help from one of the Building Supervisors (Dave J) from work and he set about measuring up the rear of the car to make the exhaust. First from a large sheet of PLY he set about cutting the side of the exhausts to get the best fot over the spoiler on the scirocco. With a chosen design he cut a complete set ready for construction. They will be sprayed black from fitted to the car.
 |
 |
 |
Cutting the shapes |
Spacing out |
Cutting to fit spoiler |
 |
 |
 |
Construction takes place.. |
1st coat of spray ... |
Both vents test fitted ... |
 |
 |
 |
Fitted but without vents ... |
Securely mounted ... |
Lourves inserts ... |
Spraying the Car
Spray time! It was time to spray the car... We had a couple of options .. 1 to find a cheap sprayer to spray the whole car...the cheapest we found was £500 pounds... or option 2 spray the car ourselves! costs around £25.00. We went for option 2, it may not be the best option but this is a banger rally so £25.00 seems the best option to go for.. I bought a job lot of "Aluminum" Spray paint off Ebay for £16.00 plus a couple of cans of black from my local Pound shop. We set about masking up the car and over 3 days set about spraying each side and then the roof and bonnet. The spray I had got for the car was nasty stuff and didnt settle well compared to the black and grey areas of the car. However the car is beginning to to shape, so now we need to fit some of the extra external parts to make the car stand out a bit more :)
 |
 |
 |
 |
Panel by Panel |
Masking up other areas |
Nearly a whole side |
A whole side done! |
 |
 |
 |
 |
Bonnet & Roof .. |
Flux Band Fitted |
Rear Vents Fitted |
Another shot of rear vents |
Making The Flux Capacitor

Nearly forgot.. what was i thinking..
I needed to make our Flux Capacitor.. as with out it.. we can not make time travel possible.. So I set about getting the required parts to make our version of the world famous time travel part.
The core of our Flux Capacitor would be made from a genuine Intel Pentium III processor, mounted into our Capacitor housing, the flux bands would be attached and this in turn would be connected via the flux exhuast systems and injected into the engine. Once the car gets to 88mph, the magic would happen.
 |
 |
 |
Clear lid box, Cpu & Leds |
Mounting the Pentium III |
Mounting the LED's |
 |
 |
 |
Soldering the LED's |
First Array Test |
Full Array Test |
 |
|
|
Fitting on the back shelf |
Flux in the car running |
A Quick Test of our Flux Capacitor Fluxxing |
The Gadgets
To make our jounrey a little more interesting and i suppose that fact we are technology heads, we have installed some extra gadgets into the car.
- Front Mounted Video Camera
- Rear Mounted Video Camera
- Dash mounted TV to view the cameras.
- GPS Tracking Device to record our movements & record photographs.
- GPS Linked Laptop, so we can update this site and communicate!
- CB Radio, just incase we want to speak to the other teams that have one installed.